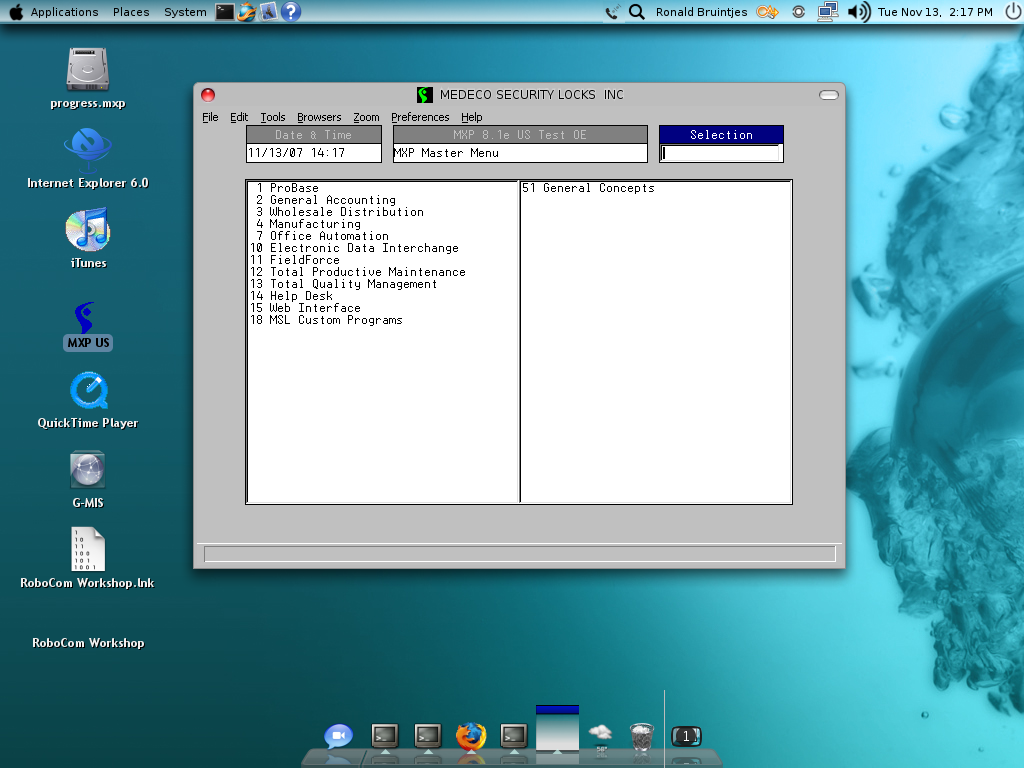
Setting up MXP to run under Linux
Recently our systems administrator asked me if it was possible to run MXP under Linux. “I don’t think there is a client of Progress for Linux, at least not graphical”, was my first response. But I got intrigued, and started digging (or rather, googling) around. And it is possible.
I’ll describe what I did under Ubuntu 7.10 with Progress 10.0B, and MXP 8.1E. The steps should be very similar for other Linux flavors, or later versions of Progress and MXP.
Step 1: Install Wine
The first step is the easiest: install wine.
sudo apt-get install wine
This should install wine (if it wasn’t already installed), and any dependencies.
Step 2: Configure wine with IEs4Linux
The next step is to configure wine. You can do all of it manually, but by far the easiest is to use IEs4Linux. You don’t have to use the latest beta (which includes support for IE7), since we’re only interested in the underlying framework, not the support of IE.
The best place to look is the IEs4Linux website, but in case the steps aren’t available:
- Open a terminal
- Open /etc/apt/sources.list
sudo gedit /etc/apt/sources.list - Uncomment or add the following lines
deb http://us.archive.ubuntu.com/ubuntu gutsy universe - Add this line:
deb http://wine.budgetdedicated.com/apt gutsy main - Close gedit, update apt-get package list and install cabextract:
sudo apt-get update
sudo apt-get install cabextract
You might get an error about an untrusted site (wine.budgetdedicated.com), but you can ignore that. - Download IEs4Linux and install
wget http://www.tatanka.com.br/ies4linux/downloads/ies4linux-latest.tar.gz
tar zxvf ies4linux-latest.tar.gz
cd ies4linux-*
./ies4linux
Step 3: Install Progress 10.0B
To install Progress, you have to have your license code handy. Also, in my case I had the installation CD copied to the hard drive. In any case, it’s as easy as typing
wine setup.exe
and following the prompts.
Note: the standard installation of wine treats everything as Windows 2000. I ran the setup under Windows 2000, then switched to Windows XP as standard. I don’t think there is a difference for Progress.
Step 4: Installing MXP
I’m assuming that you already have an installation of MXP on your network somewhere. If not, install it from a regular Windows machine, and copy your settings over.
The installation of MXP hinges on a couple of things:
- The startup icon. Copy this from a Windows machine already running MXP
- The services file. This is used to connect to the proper databases. Add the services needed to /etc/services.
- Most installations have a shared drive that contains sources or compiled programs. So that will be our next step.
Step 5: Creating a mount to a Windows Share
We have all the compiled programs installed on a share on our Windows server, which is mapped to the Q drive. The first step is to make this Windows share visible on our Linux box:
- Make sure you have the Samba filesystem installed:
sudo apt-get install smbfs - Add a line to /etc/fstab like this:
//admin/progress.mxp /mnt/progress.mxp smbfs credentials=/home/ronald/.smbpassword,user,defaults 0 0
This will allow the system to automatically mount the Windows share (//admin/progress.mxp) on a mounting point on Linux (/mnt/progress.mxp) as Samba (smbfs) with the credentials from a hidden file .smbpassword - Create the .smbpassword file:
gedit .smbpassword
username=DOMAINronald
password=TopSecret
Step 6: Linking a drive letter to a Windows Share
Wine has a nice little solution to map shares to drive letters:
- Select Applications->Wine->Configure Wine
- Select the Drives tab
- Add a drive mapping
ln -s /mnt/progress.mxp q:
Step 7: Install the foresight.fon font
At this point you should be able to start MXP with the icon, and be OK until you actually enter a username and password. After that, all hell breaks lose because the foresight font is not installed properly. I muddled around for a while, and finally came across this:
- Make sure you have the microsoft core fonts installed.
sudo apt-get install msttcorefonts - Install fontforge
sudo apt-get install fontforge - Use fontforge to convert foresight.fon to a BCF file.
- Open foresight.fon in fontforge.
- Go to the “Element” menu, and choose “Font Info…”
- Go to the Encoding tab
- Click the box next to Encoding (probably reads Windows Latin (“ANSI”)
- Choose “ISO 8859-1 (Latin1)”
- Click “OK”
- Go to the File menu, choose “Generate Fonts…”
- The right hand box should be set to BDF, if not, change it to BDF
- Click “Save”
- 96 dpi is sufficient, click OK
-
Go to where you saved the font, and rename it to how you want it to show up, i.e. foresight.bdf
- Convert it from BDF to PCF format:
bdftopcf -o foresight.pcf foresight.bdf - Create a bitmapped fonts directory
sudo mkdir /usr/share/fonts/bitmaps - Copy and install the font
- sudo cp foresight.pcf /usr/share/fonts/bitmaps
-
sudo mkfontdir /usr/share/fonts/bitmaps
- Make the new directory available as a font directory
xset fp+ /usr/share/fonts/bitmaps - Refresh the font server
sudo xset fp rehash
